Explosion-Proof Lighting: Your Aerospace Defense Safety Guide
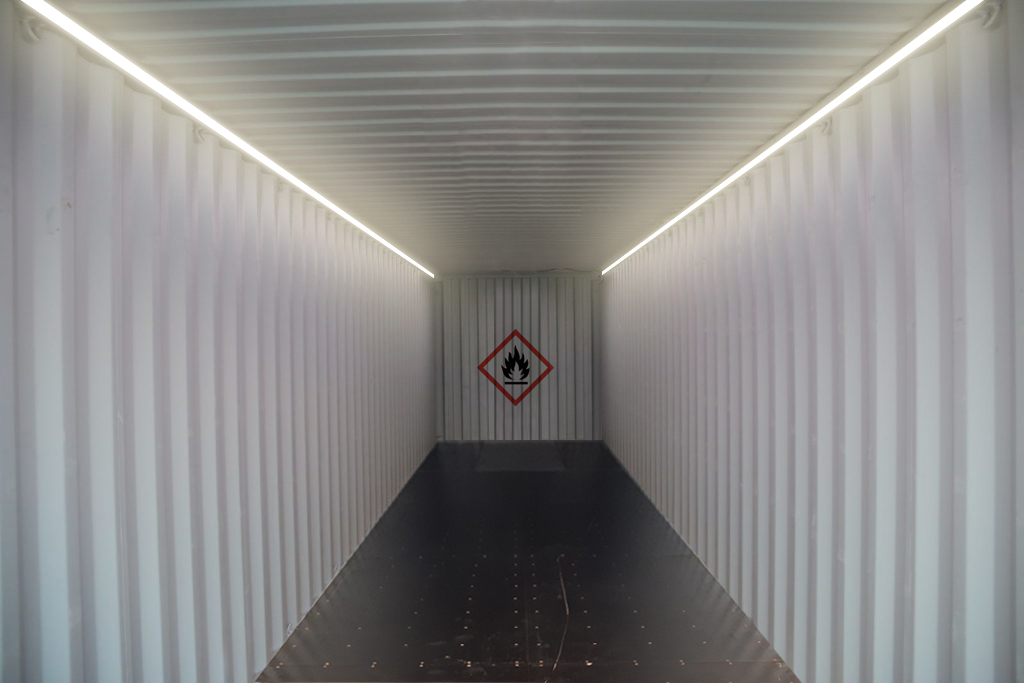
What if your lighting system could be the difference between mission success and catastrophic failure? What if your lighting system could be the difference between mission success and catastrophic failure? When you’re working in aerospace and defense environments, standard lighting isn’t just inadequate—it’s dangerous. The stakes couldn’t be higher when explosive atmospheres, volatile fuels, and sensitive operations converge. Here’s what you’ll master and implement after reading this guide. Key Takeaways: • Identify critical explosion-proof lighting requirements for your specific aerospace applications • Select proper certification levels (ATEX, IECEx, UL) based on your operational zones • Implement advanced lighting strategies that exceed military specifications • Build compliance frameworks that satisfy both safety regulations and mission demands • Execute cost-effective retrofits without compromising operational readiness The Hidden Risks Lurking in Your Current Lighting Setup Your current lighting infrastructure might be ticking time bomb. In aerospace and defense operations, you’re dealing with jet fuel vapors, hydraulic fluid mists, explosive ordnance, and pressurized systems daily. Standard commercial lighting fixtures weren’t designed for these environments—they’re potential ignition sources waiting to trigger disaster. Consider this: a single spark from faulty wiring inside a conventional light fixture can ignite fuel vapors in aircraft hangars, ammunition storage facilities, or fuel depots. The consequences range from equipment damage costing millions to loss of life and mission failure. Insurance companies know these risks, which is why they’re increasingly requiring explosion-proof lighting certification for coverage in hazardous locations. The regulatory landscape has tightened significantly. OSHA, NFPA, and military specifications now mandate specific lighting standards for different hazard classifications. Non-compliance doesn’t just risk accidents it triggers legal liability, project delays, and potential contract cancellations. Your organization’s reputation and operational license depend on getting this right. The financial impact extends beyond immediate safety concerns. Downtime from lighting failures in critical operations can cost thousands per hour. When you factor in mission delays, equipment damage, and regulatory fines, the total cost of inadequate lighting solutions becomes staggering. Now let’s dive into exactly how explosion-proof lighting technology eliminates these risks while enhancing operational capability. The Science Behind Explosion-Proof Protection Explosion-proof lighting works like a fortress around potential ignition sources. The technology doesn’t prevent explosions from occurring—instead, it contains any explosion within the fixture itself, preventing it from igniting the surrounding hazardous atmosphere. Think of it like a controlled demolition. If sparks or heat develop inside the fixture, the explosion-proof enclosure absorbs and dissipates the energy safely. The enclosure design includes flame-tight joints, reinforced materials, and specific thread engagement requirements that create an impenetrable barrier between internal electrical components and external hazardous gases or dust. The classification system follows a precise hierarchy. Class I locations contain flammable gases or vapors (like jet fuel), while Class II involves combustible dust (such as aluminum powder used in aerospace manufacturing). Division 1 areas have hazardous substances present under normal operations, while Division 2 locations only encounter them under abnormal conditions. Temperature ratings add another layer of sophistication. T-codes indicate the maximum surface temperature the fixture can reach without igniting specific substances. Aviation fuel requires different temperature limits than hydraulic fluids or cleaning solvents commonly used in defense applications. Modern explosion-proof lighting incorporates LED technology, intrinsically safe wiring. These advances deliver superior illumination quality, energy efficiency. Next, you’ll discover the specific methodologies and frameworks for implementing these systems in your operations. Advanced Selection and Implementation Strategies Selecting optimal explosion-proof lighting requires a systematic approach that balances safety requirements, operational needs, and cost constraints. Professional lighting designers use a multi-tier decision framework that eliminates guesswork and ensures regulatory compliance. Hazard Classification Decision Matrix: Environment Type Class/Division Required Certification Typical Applications Temperature Code Aircraft Hangar Class I, Div 2 UL 1598, ATEX Maintenance bays, fuel areas T3A Fuel Storage Class I, Div 1 UL 1203, IECEx Tank farms, loading docks T2A Ordnance Handling Class II, Div 1 Mil-Spec 901 Ammunition storage, processing T4A Paint Booths Class I, Div 1 NFPA 33 Aircraft coating, refinishing T3A The implementation methodology follows a five-phase approach that minimizes operational disruption while ensuring comprehensive coverage: Phase 1 – Site Assessment: Document all hazardous areas using gas detection surveys and historical incident data. Map electrical infrastructure and identify retrofit challenges before selecting fixtures. Phase 2 – Compliance Verification: Cross-reference local codes, insurance requirements, and military specifications. Verify that selected fixtures carry proper third-party certifications for your specific applications. Phase 3 – Design Optimization: Calculate illumination levels using advanced photometric modeling. Factor in fixture spacing, mounting heights, and maintenance access requirements. Phase 4 – Installation Protocol: Implement proper grounding, conduit sealing, and junction box specifications. Use certified electricians familiar with hazardous location requirements. Phase 5 – Validation Testing: Conduct comprehensive commissioning that includes ground fault testing, insulation resistance verification, and photometric confirmation. Your next step involves translating this framework into actionable implementation plans. Your Implementation Roadmap with Real Simulation Examples Start with a comprehensive site audit using this systematic checklist. Document every area where flammable substances might be present, even intermittently. This includes obvious locations like fuel storage and less obvious areas such as parts cleaning stations or battery charging rooms. Immediate Action Steps: Worked Example – Aircraft Hangar Retrofit: A typical 40,000 square foot aircraft maintenance hangar requires approximately 85 explosion-proof LED fixtures to achieve 50 foot-candles at floor level. Using 150-watt explosion-proof LED fixtures with 20,000 lumen output, the total power consumption drops to 12.75kW compared to 34kW for equivalent HID explosion-proof fixtures. Cost Analysis: Use manufacturer photometric software like DIALux or AGi32 to model your specific installation. These tools generate precise fixture layouts and verify compliance with illumination standards. The key to successful implementation lies in understanding the nuanced requirements that separate adequate solutions from optimal ones. H2 – Resources & Next Steps: Building Your Expert Network Professional development in explosion-proof lighting requires ongoing education as technologies and regulations evolve. The International Association of Lighting Designers (IALD) offers specialized courses in hazardous location lighting that combine theoretical knowledge with practical application techniques. Essential Reference Materials: Software Tools: DIALux Pro includes explosion-proof fixture libraries from major